A Deeper Dive of kube-scheduler
Tue Dec 12 2023
At OpenAI I have spent the last few months of my life developing a Kubernetes scheduler plugin to customize preemption to better suit our ML workloads. This has been the most challenging project in my career so far. There were countless times where I wanted to quit and just declare it was too difficult. The only reason I pursued was because I really wanted to know how the scheduler worked. There were multiple occasions where I thought I truly understood the scheduler and then later realized that there were still more mysteries hidden deeper within. I now believe that I completely (🤞) understand how kube-scheduler works and want to share what I’ve learned.
Unfortunately getting a proper understanding of kube-scheduler is difficult because there are no online resources explaining how it actually works. The scheduling framework README provides a good outline but isn’t comprehensive. The scheduling framework is also a somewhat leaky abstraction so you really do need to know how the scheduler works internally if you want to write a non-trivial plugin. The scheduler codebase is incredibly complicated and the goal of this blog post is to shine a light on how everything fits together. I will mostly focus on explaining preemption because it’s both the most undocumented and most complex part of the scheduler. I hope this lowers the barrier of entry for future wanderers trying to create their own scheduling plugins.
Misconceptions
I’ve always naively assumed I knew how kube-scheduler worked under the hood because it was “just doing bin-packing”. I couldn’t have been more wrong and have since learned a lot by studying its inner workings. The Kubernetes scheduler is brilliantly designed in my opinion and an inspiring example of how effective good plugin frameworks can be.
Prerequisite Knowledge
I’m assuming the reader is a seasoned Kubernetes user and understands how pod scheduling works from a user perspective. You can read this to brush up on Kubernetes scheduling if needed. First let’s define some terms that maybe only experienced Kubernetes users have come across.
A nominated pod p is a pod which has just preempted some set of lower priority pod(s) v. After this preemption, p is re-queued to schedule once all pods in v terminate. A “nominated node” is the node on which the preemption took place. The scheduler will prefer to place p to it’s nominated node when possible but this is not guaranteed.
A Kubernetes feature which lets you ask the scheduler to avoid preempting certain pods on a best-effort basis. The PDB object has a label selector that is used to match a set of pods you hope to protect from preemption.
Scheduling Framework Overview
A pod being scheduled goes through the following different stages of the scheduler framework.
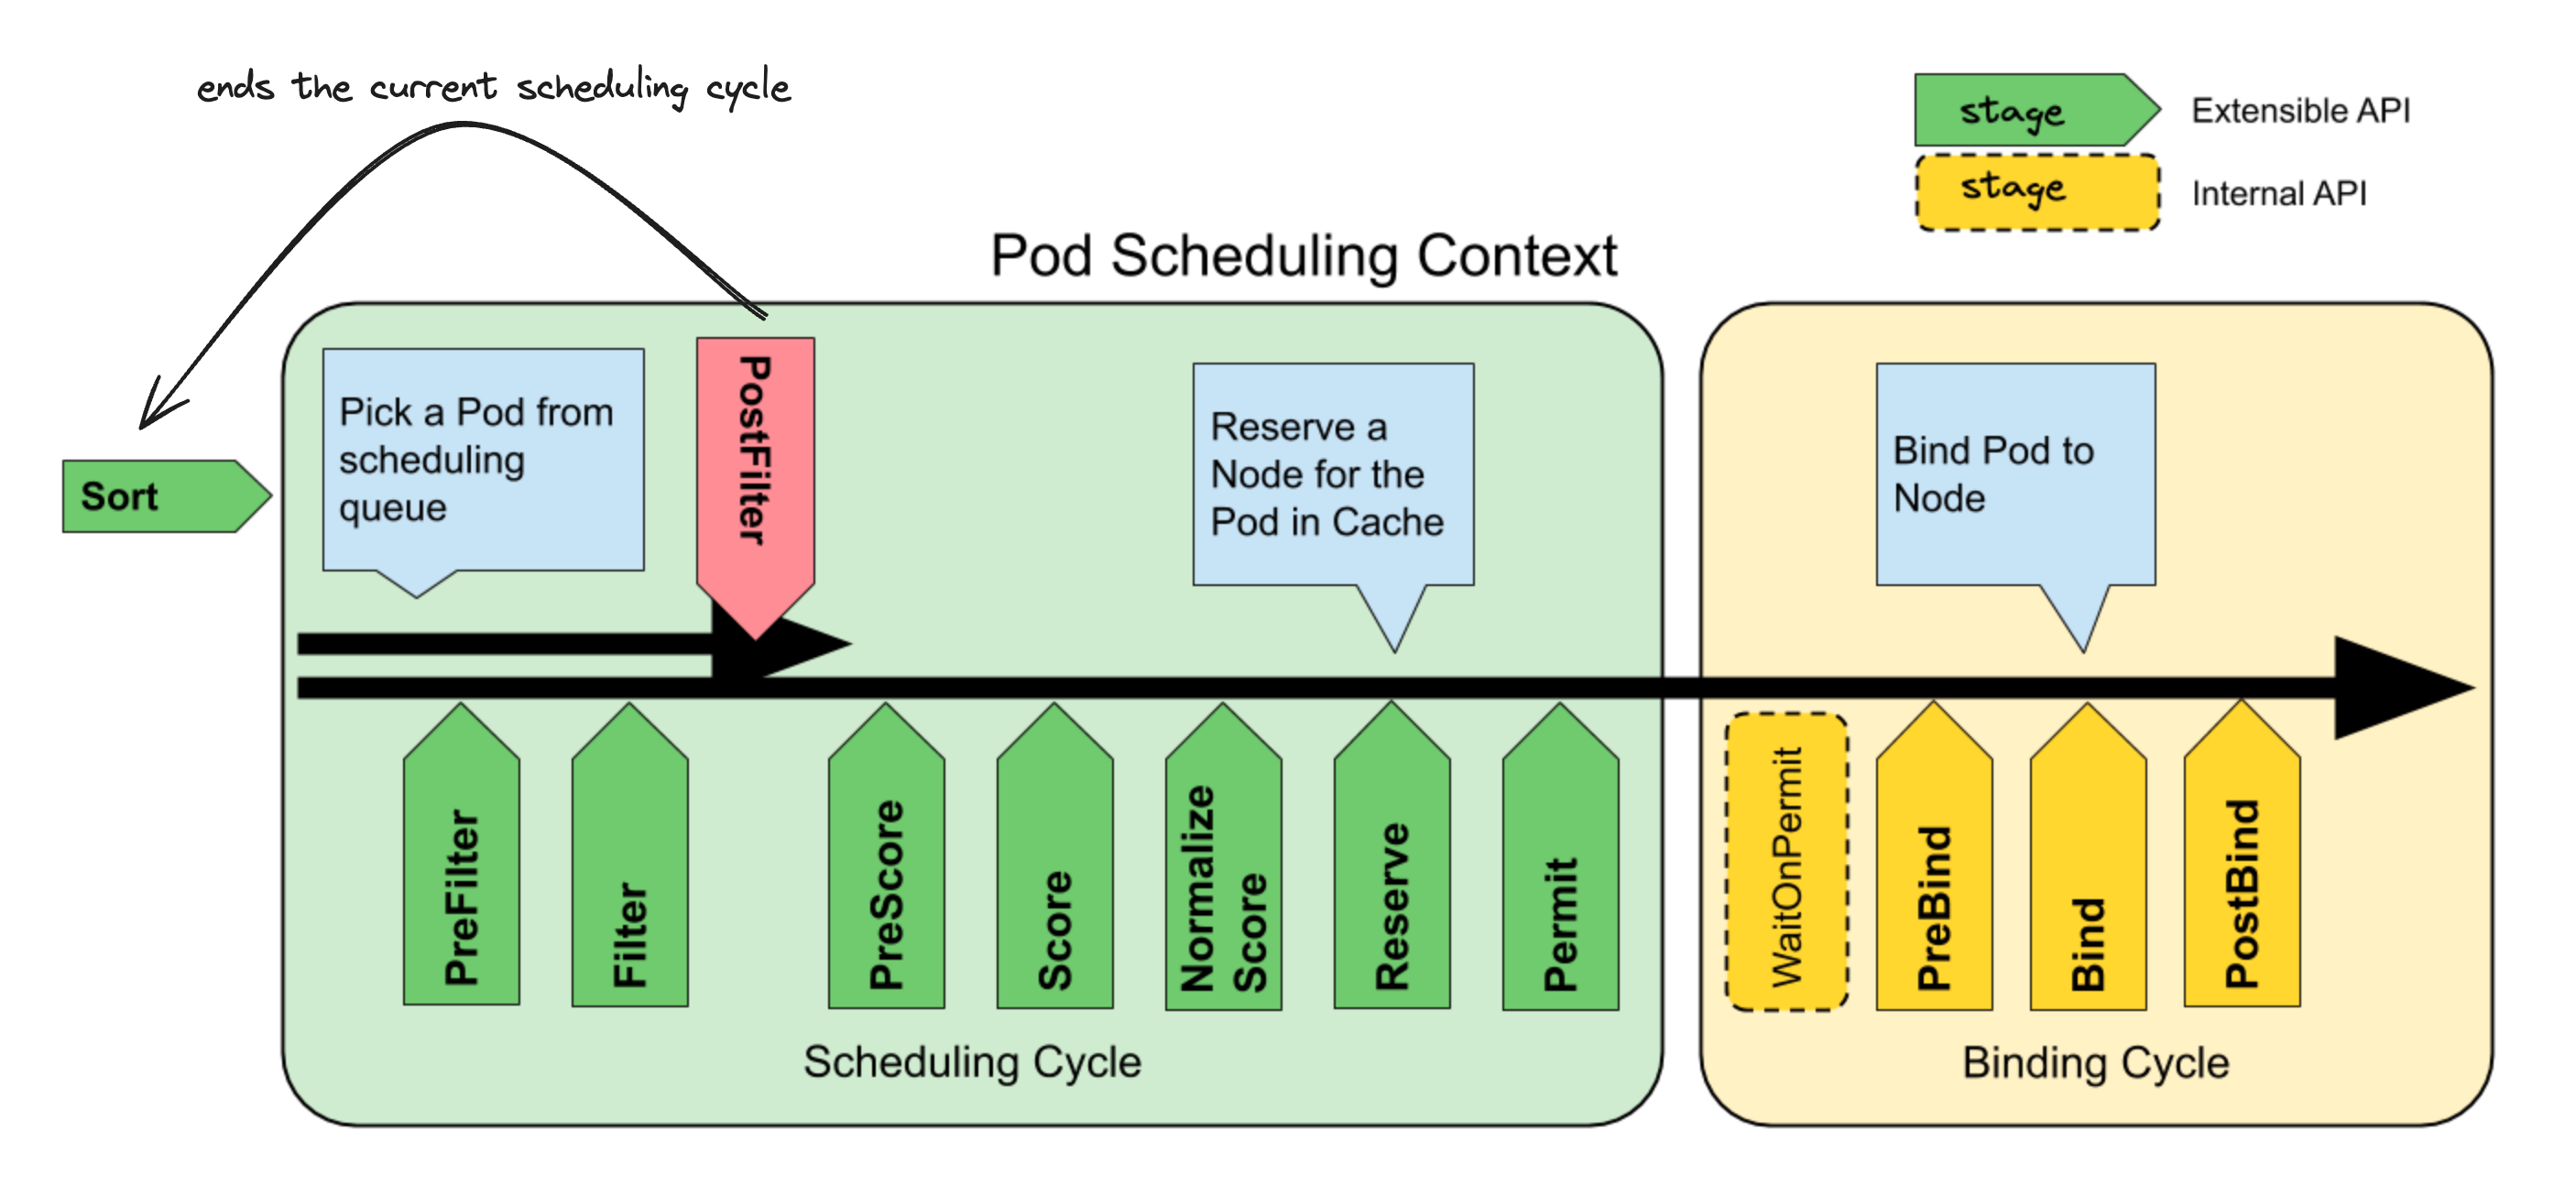
The behavior of each stage can be modified by both custom and K8s native plugins. Also each stage (except for Sort) can have multiple registered plugins and the framework documentation provides clear semantics on how multiple plugins of the same stage interact with each other. All of my source code links will be for Kubernetes v1.28, but all the concepts and implementations mostly haven’t changed since the introduction of the scheduler framework in v1.19.
The pod p currently being scheduled enters the scheduling cycle once it is popped off the scheduler’s pod queue. The queue is sorted by pod priority and you can learn more about how it works here. Each scheduling cycle runs serially pod-by-pod and attempts to assign the current pod to some node in the cluster. Below I’ll explain the minimal set of things you need to understand about the scheduling framework to grok how preemption works.
CycleState Object:
CycleState is just basically a thread safe key-value store. An empty CycleState object is created at the start of every scheduling cycle to store arbitrary state needed in the current scheduling cycle. There is one shared CycleState object per scheduling cycle and plugins typically use it to store their internal state and as a communication channel between the multiple scheduling stages. The CycleState object must implement a deep copy function and we’ll soon see this is needed to make preemption efficient and accurate.
Filter Stage:
Each Filter plugin decides whether a specific pod should be able to schedule on a specific node. A pod can only be scheduled onto a “feasible” node, which is a node where the pod passes all Filter plugins. Each Filter plugin decides to accept or reject a specific node by running a custom function that takes the following data inputs:
- A node object
- A pod object
- A CycleState object
If there are no feasible nodes for the pod being currently scheduled then the scheduler will attempt preemption by running the PostFilter plugins.
PreFilter Stage:
Note: This is the most confusing stage of the scheduling framework. It is also key to truly understanding preemption.
All PreFilter plugins are run once right before the Filter stage above. The main purpose of the PreFilter plugins is to initialize any custom state needed by a plugin and persist it to CycleState. This custom state is then later fetched and used by it’s corresponding Filter plugin to make scheduling decisions. This custom state can also be mutated during preemption as the scheduler searches for which pods it can legally preempt. You need to implement the AddPod and RemovePod PreFilter callbacks if your Filter plugin uses any custom state that depends on pod information. This ensures that preemption respects the restrictions imposed by your Filter plugins and won’t make a preemption decision that will lead to a violation of your constraints.
PostFilter Stage:
PostFilter plugins run if the Filter stage fails. You can register multiple PostFilter plugins if you like and they will be executed in order of declaration. PostFilter plugins are typically used to implement preemption but you can in theory run whatever code you want. The preemption algorithm shipped in Kubernetes by default is implemented by the DefaultPreemption PostFilter.
Binding Cycle:
A pod is sent for “binding” once the scheduler decides the pod should land on a specific node. Understanding the binding stages aren’t necessary for this blog post but one important thing to note is that all pod binding is done asynchronously. This is done so the main scheduling loop isn’t blocked and enables higher scheduling throughput. The scheduler starts assuming the pod is already scheduled once a pod enters the binding cycle. If the pod binding fails later for whatever reason, the Unreserve rollback hook will be called for all plugins so that each plugin can revert any optimistic updates to their custom state.
Eating Your Own Dogfood:
One of my favorite things about the kube-scheduler codebase is that every native scheduling feature is implemented using the framework above. Here are some examples:
- Resource requests in Kubernetes work via the Fit plugin which implements a Filter plugin to exclude nodes that lack the pod’s requested resources
- Taints and tolerations functionality comes from the TaintToleration plugin which also uses a Filter plugin to ensure node taints are respected
- Standard pod preemption comes from the DefaultPreemption plugin which is implemented using a PostFilter plugin
Deep Dive: Default Preemption
Pod preemption is by far the most complicated functionality in the scheduler because it ties together multiple scheduling stages in complex and undocumented ways. It’s important to clarify what default preemption is trying to accomplish before diving into the details.
The goal of default preemption is to find the optimal set of victim pods located on the same node that need to be removed in order for a higher priority pod
pto use that node. This minimal set of victims must also preferably not violate PDBs, have minimal pod priority, and also create minimal pod churn once evicted
Deciding which pods to preempt can get complex because there can be scheduling co-dependencies between pods. For example if victim pod server has a required pod-affinity with a colocated victim pod database, then default preemption should also remove server if it decides to remove database (but not vice versa!). Also remember that any custom plugin can introduce arbitrary scheduling dependencies like this. When performing preemption the scheduler must always honor all these scheduling dependencies, preempt the minimal set of pods, optimize for honoring PDBs, and also minimize the priority of preempted victims. So it’s no wonder kube-scheduler is so damn complicated 😅
How it all interplays together is really quite genius though. Below is a full code trace of every important step in the scheduling cycle when pod p performs a successful preemption. There are some complex behaviors which I’ve annotated with [1] and [2] to discuss separately for readability reasons. I’ll be assuming the DefaultPreemption is the only registered PostFilter plugin.
Preemption Control Flow
- Scheduler pops pod
poff the priority queue and begins the scheduling cycle - Scheduler takes a snapshot of all the node objects and pod objects in cluster at the current instant in time
- PreFilter stage:
- All PreFilter plugins are run and some may decide to persist their initial custom state into CycleState
- Any PreFilter plugin can also decide to fail and the entire scheduling cycle will be aborted for pod
p
- Filter stage:
- All Filter plugins are run [2] for
pon each node in cluster in parallel - If all Filter plugins pass for a specific node then it will be considered feasible
- All Filter plugins are run [2] for
DefaultPreemptionPostFilter runs if there are no feasible nodes:- First findCandidates searches for legal eviction candidates whose removal would allow preemptor
pto schedule. Here is how the search works:- Note: An “eviction candidate” is just a set of victims pods located on the same node that, if removed, would allow
pto schedule on that node - DryRunPreemption searches to find all possible eviction candidates in the cluster. It does this by running SelectVictimsOnNode [1] on each node in cluster in parallel. Each parallel call is given it’s own separate copy of the node and CycleState objects
- Each call to SelectVictimsOnNode [1] returns an eviction candidate
Cif one exists for it’s specified node
- Note: An “eviction candidate” is just a set of victims pods located on the same node that, if removed, would allow
- SelectCandidate picks the best eviction candidate
Bfrom the list returned by findCandidates- Eviction candidates are selected according to this criteria which prefers evicting candidates that have less PDB violations, lower priority pods, etc
- prepareCandidate performs the actual preemption of
B- Deletes the victim pods belonging to
Band cleans up nominations for victim pods if necessary - Emits a Kubernetes
Preemptedevent
- Deletes the victim pods belonging to
- First findCandidates searches for legal eviction candidates whose removal would allow preemptor
- The PostFilter plugin then returns the nominated node
nnif there was a successful preemption - Scheduler sets
p's.status.nominatedNodeNamefield tonnand also tracks the nomination in the scheduler’s local cache - Pod
pis re-queued since it can’t schedule until the preempted victims have terminated and released their resources
[1] Understanding SelectVictimsOnNode
This function searches for the best possible eviction that could happen on a specific node n_i that would allow p to schedule. The main thing to note here is that the node n_i and CycleState s_i objects passed to this function are deep copies so they be harmlessly modified. This allows the scheduler to run SelectVictimsOnNode for all nodes in parallel to search the entire cluster for what it can legally preempt. The following logic is used to determine the best possible eviction on the current node:
- First all pods with lower priority than
pare removed from the copied noden_i. All of these removed podsv_jare considered to be possible victims- All PreFilter
RemovePodcallbacks are invoked with (v_j,n_i) for all scheduling plugins (both custom and native). This alerts each plugin that a certain pod was removed and gives them a chance to update their custom state stored in the copys_i
- All PreFilter
- Then these removed pods are iterated through one-by-one and attempted to be re-added back to the copied node
n_i- Pods protected by PDBs are attempted to be restored first. Then pods with higher priorities are attempted to be restored
- When trying to restore each single victim pod
v_jthe scheduler will:- Re-run all PreFilter
AddPodcallbacks with (v_j,n_i) for all scheduling plugins (both custom and native). This alerts each plugin that a new pod was added and gives the plugins a chance to update their custom state stored in the copys_i - Then all Filter plugins [2] are run with (
p,n_i,s_i) as inputs. If they all pass, then the attempt to restorev_jsucceeded because we’ve confirmed thatpcan schedule on the node even whilev_jis present - If
v_jhas been successfully restored (or “reprieved” in kube-scheduler parlance), it will not be included in the eviction candidateCreturned by SelectVictimsOnNode
- Re-run all PreFilter
- All the pods that were initially removed but failed to be restored are returned as victims in eviction candidate
C
[2] Reducing Pod Churn
You almost have the full explanation of how preemption works now except there is one essential detail missing. Whenever I mentioning running all Filter plugins above (annotated with [2]), the scheduler will actually trick all the Filter plugin implementations into thinking that nominated pods on that node are already scheduled. This might not surprise you yet because the function used to run all Filter plugins is named RunFilterPluginsWithNominatedPods. The sneaky thing is that the scheduler will only pretend a nominated pod is scheduled if it has a ≥ priority than p.
Recall that nominated pods are re-queued to schedule and haven’t entered the binding cycle yet. So without this hidden reservation system, most nominated pods would experience repeated churn because any pod ahead in the queue could steal their spot once their victim pods finish terminating. Using p's priority to decide which nominated pods to reserve space for reduces pod churn because it prevents p from scheduling now and then getting later preempted by a higher priority nominated pod. This optimization is an example of an efficiency win that also creates a leaky abstraction. This reservation system will silently break if the developer wants to implement a custom preemption algorithm which doesn’t always preempt according to priority.
If all Filter plugins pass with nominated pods added, there is actually one more thing to verify before the node is considered feasible. Let’s imagine that we’re running a website and our server pod needs to be co-located with a database pod in order to serve traffic and we ensure this via a required inter-pod affinity. Because the scheduler lies to the Filter plugins that all nominated pods are scheduled, the inter-pod affinity Filter plugin would happily approve the scheduling of pod server onto database’s nominated node. Recall though that nominated pods like database aren’t guaranteed to schedule on their nominated nodes. So we can’t just allow the server pod to schedule onto this nominated node now and send it for binding because doing so could possibly violate a required inter-pod affinity. This is why the scheduler also makes sure all Filter plugins pass without nominated pods as well. This ensures that a node’s nominated pods aren’t actually strictly needed to legally schedule p on that node.
Additional Benefits of Snapshotting
There are additional benefits to taking a snapshot of all pods and nodes at the start of each scheduling cycle which I haven’t discussed yet. Using a snapshot in the scheduling cycle also:
- Ensures that all plugins see and act based on the same cluster state
- Reduces etcd strain
- Improves both scheduling throughput and latency
- Gives the scheduler an avenue to implement certain optimizations. For example, all plugins are tricked into thinking that pods undergoing binding are actually scheduled because the scheduler lies about this via the snapshot
Key Takeaways
I feel that working in the scheduler codebase has made me a better programmer. Here are some key lessons that I’ve personally internalized after spending (too) much time in this codebase.
1) Embrace Reading Source Code
All the existing kube-scheduler documentation and “deep dive” articles online provide nowhere near the level of detail needed to write a scheduling plugin. You just have to accept that you’ll often need to read the code directly if you want to work on new or fringe projects. Most of my learning came from reading the scheduler-plugins and kube-scheduler source code.
2) Lean into the OSS Community
The Kubernetes community is full of amazingly helpful and knowledgable people. When I was struggling to understand the scheduling of nominated pods, I reached out to Wei and within hours I was unblocked. I’m still surprised by how maintainers are so willing to assist random people on the internet. I recommend joining the Kubernetes Slack workspace if you’re stuck on something or have a very specific question.
3) Well Designed Frameworks Are Extremely Powerful
I’m still impressed at how general, extensible, and powerful the scheduling plugin framework is. Every Kubernetes scheduling feature is still implemented using this framework that is almost 10 releases old! Allowing developers to build on the same framework opens up endless possibilities for customization without needing to fork the scheduler. The scheduling plugin framework has inspired me to spend more time searching for the right core abstractions when designing my own frameworks.
4) Snapshots Are Clutch
Before working on the scheduling plugin, I hardly thought about using snapshotting and viewed it as a technique reserved for complex tasks like say implementing MVCC. I’ve now started using snapshotting more in other systems I work on and I love it. I view it as an opportunity to simultaneously introduce consistency and improve performance. It’s not a silver bullet though obviously because not all systems can accept the tradeoff of stale data that comes with snapshotting.
More Scheduling Resources
- See the Pod Preemption design proposal to see why certain scheduling design decisions were made
- See the Scheduler Queueing design doc to learn more about how the scheduler queue works
- Visit scheduler-plugins to see what OSS scheduler plugins exist and how they’re implemented. Ideally you use one of these plugins instead of building your own because writing your own plugin is hard!
- Check out kube-scheduler-simulator for an interactive visualization of the scheduler’s decisions. You can bring your own custom scheduler and watch it in action
- Use kwok to stress test and e2e test your scheduler plugin without actually running kubelet. You can similarly test other parts of the control plane like CRDs, controllers, etc. without needing any physical hardware
- For example, you can use kwok to create fake nodes with GPUs and see what your custom scheduler would do
- I like to deploy kwok into k3d because k3d can also run real pods. This is useful if your pod scheduling depends on other pods running in-cluster (e.g. a pod webhook)
- Check out the #wg-batch and #sig-scheduling Kubernetes Slack channels. I check both these channels daily now and ask tons of questions there. The folks there are very responsive and knowledgable
Thanks
- Andrew Cann, Ben Chess, Christian Gibson, and Wei Huang providing feedback on this post
- Wei Huang for helping me navigate the kube-scheduler codebase